Concept Byte: Compass Designs
Use With Lesson 1-6
ACTIVITY
In Lesson 1-6, you will use a compass to construct geometric figures. You can construct figures to show geometric relationships, to suggest new relationships, or simply to make interesting geometric designs.
Activity
-
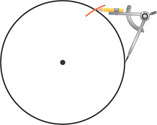
Step 1 Open your compass to about 2 in. Make a circle and mark the point at the center of the circle. Keep the opening of your compass fixed. Place the compass point on the circle. With the pencil end, make a small arc to intersect the circle.
-
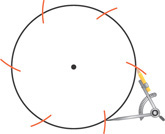
Step 2 Place the compass point on the circle at the arc. Mark another arc. Continue around the circle this way to draw four more arcs—six in all.
-
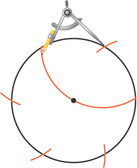
Step 3 Place your compass point on an arc you marked on the circle. Place the pencil end at the next arc. Draw a large arc that passes through the circle's center and continues to another point on the circle.
-
Step 4 Draw six large arcs in this manner, each centered at one of the six points marked on the circle. You may choose to color your design.

Step 1

Step 2

Step 3

Step 4
Exercises
- In Step 2, did your sixth mark on the circle land precisely on the point where you first placed your compass on the circle?
- Survey the class to find out how many did.
- Explain why your sixth mark may not have landed on your starting point.
-
Extend your design by using one of the six points on the circle as the center for a new circle. Repeat Steps 1–4 with this circle. Repeat several times to make interlocking circles

Table of Contents
- 6-1 The Polygon Angle-Sum Theorems
- 6-2 Properties of Parallelograms
- 6-3 Proving That a Quadrilateral Is a Parallelogram
- 6-4 Properties of Rhombuses, Rectangles, and Squares
- 6-5 Conditions for Rhombuses, Rectangles, and Squares
- 6-6 Trapezoids and Kites
- 6-7 Polygons in the Coordinate Plane
- 6-8 and 6-9 Coordinate Geometry and Coordinate Proofs


