


Adjust the lever of the diaphragm to allow the right amount of light to enter.
To change the magnification, rotate the nosepiece until the desired objective is in line with the body tube and clicks into place.
Look through the eyepiece and use the fine adjustment knob to bring the image into focus.
After every use, remove the slide. Return the low-power objective into place in line with the body tube. Clean the stage of the microscope and the lenses with lens paper. Do not use other types of paper to clean the lenses; they may scratch the lenses.
Preparing a Wet-Mount Slide
Obtain a clean microscope slide and a coverslip. A coverslip is very thin, permitting the objective lens to be lowered very close to the specimen.
Place the specimen in the middle of the microscope slide. The specimen must be thin enough for light to pass through it.
Using a dropper pipette, place a drop of water on the specimen.
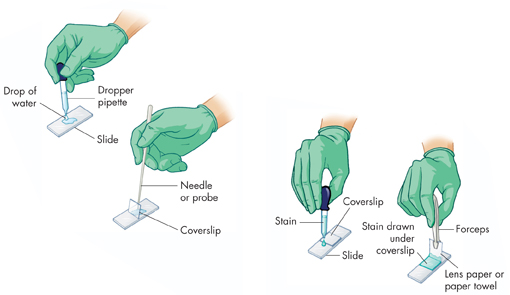
Lower one edge of the coverslip so that it touches the side of the drop of water at about a 45° angle. The water will spread evenly along the edge of the coverslip. Using a dissecting needle or probe, slowly lower the coverslip over the specimen and water as shown in the drawing. Try not to trap any air bubbles under the coverslip. If air bubbles are present, gently tap the surface of the coverslip over the air bubble with a pencil eraser.
Remove any excess water around the edge of the coverslip with a paper towel. If the specimen begins to dry out, add a drop of water at the edge of the coverslip.
Staining Techniques
Obtain a clean microscope slide and coverslip.
Place the specimen in the middle of the microscope slide.
Using a dropper pipette, place a drop of water on the specimen. Place the coverslip so that its edge touches the drop of water at a 45° angle. After the water spreads along the edge of the coverslip, use a dissecting needle or probe to lower the coverslip over the specimen.
Add a drop of stain at the edge of the coverslip. Using forceps, touch a small piece of lens paper or paper towel to the opposite edge of the coverslip, as shown in the drawing. The paper causes the stain to be drawn under the coverslip and to stain the cells in the specimen.
Table of Contents
- Formulas and Equations
- Applying Formulas and Equations
- Mean, Median, and Mode
- Estimation
- Using Measurements in Calculations
- Effects of Measurement Errors
- Accuracy
- Precision
- Comparing Accuracy and Precision
- Significant Figures
- Calculating With Significant Figures
- Scientific Notation
- Calculating With Scientific Notation
- Dimensional Analysis
- Applying Dimensional Analysis